Why is Cflow the Best Alternative to Approval Process Builder in Salesforce?

Salesforce is no doubt the best customer relationship management (CRM) platform currently. There is a great deal of automation that happens in Salesforce, several key business processes like the approval process can be automated in Salesforce. The Process Builder in Salesforce is taking a backseat while Flow-based automation is catching on for process automation.
Flow-based automation can be easily understood and quickly implemented. The Visual Workflow Builder in a no-code workflow automation platform like Cflow can be considered an alternative to the Process Builder in Salesforce. This blog focuses on how the approval process works in Salesforce, how to automate the approval process in Salesforce, and why is Cflow the best alternative to the Process Builder in Salesforce.
Process Automation in Salesforce
Process automation using Salesforce allows admins to create automatic and customized services that would otherwise require IT support for programming code. The lightning platform on which process automation is built includes a robust collection of declarative and programmatic automation capabilities that can be used by anyone to automate complex business operations irrespective of position, department, or company size.
There are 3 automation tools in Salesforce:
- Workflow Rule
- Process Builder
- Flow Builder
Let us explore each of these tools in detail.
Workflow Rules
This is the original automation tool built in Salesforce. Simple operations like updating fields, sending emails, and sending messages to external systems can be automated using the workflow rules tool. The activities in this tool may either occur immediately or time-dependent actions that occur at specified times. Owing to their capability of automating simple tasks, these tools are being phased out in favour of Flows.
Process Builder
The Process Builder in Salesforce is a tool used by administrators to automate actions. Similar to workflow rules, process builder also creates processes that run in the background when certain criteria are met. Process builder has all the features of workflows, except the ability to send outbound messages without using Apex code.
It has the capability of handling multiple if/then statements and executing different actions based on conditional statements in a single process, in scenarios where multiple workflows are involved. Just as workflow rules take the backseat, Process Builder to is being replaced by Flow Builder.
Flow Builder
The Salesforce Flow Builder has gained popularity over process builder owing to some powerful features like record-triggered actions, record lookups, and screen flows that seem like creating a full custom application. The flow builder provides powerful automation features that cover the capabilities of workflow rules and process builders.
There are only a few minor features absent in this tool that Salesforce is actively working on building. Flow builder can perform record-triggered automation similar to process builder, and also performs a lookup on other records like finding opportunities on Account that was recently changed. It can also perform more complex functions like looping through a list of records, using standard formula functions from workflows, and even sending outbound emails.
It is evident that flow-based process automation is packed with more capabilities and gestures compared to Process Builder or Workflow Rules in Salesforce.

Approval Process in Salesforce
Approval processes are part and parcel of business operations. From Invoices to Purchase orders to Expense reimbursements – you need approvals at various stages in order to keep the process going or achieve process outcomes. The Approval process in Salesforce is an automated process that streamlines the approval workflow in your organization.
How does approval work in Salesforce?
The approval process in Salesforce comprises steps for a record to be approved/rejected by the user or public groups, or queue. This process also specifies the actions to be taken when a record is approved or rejected or recalled, or first submitted for approval.
For instance, when an employee generates a time-off request, the approval process in Salesforce automatically sends an approval request to the employee’s manager.
How to Automate Approval Process in Salesforce?
The approval process in Salesforce is automated by the following steps.
1. Defining the approvers and setting up a queue
The approvers in the process flow can either be individuals or a team of people. The queue name is basically the name of the group or individuals that belong to that group. For example, if you are going to set up an approval process for the leasing department, the name of the queue will be “Legal Team”. Once the queue is named, the next step will be to add objects the queue should apply to; you could add several objects here. The next step is to add the queue members, after which you have to save the queue.
2. Creating email templates
The next step is to set up an email notification. When an email notification is set up, the Approver/s are notified that an action is pending on their side. Setting up an email notification can be easily done with a template. The type of the email template, folder to store the template, name, and description of the template, and text message needs to be specified while creating the template.
3. Setting up approval
The setup is the most important part of the approval process. This is where you set actions for review and approval. The first step is to tag the “Approval”, next you have to choose the object for your approval. Then you go on to name the approval process and define whether the records triggered by the process need to fulfil certain criteria. Finally, you choose an automated approver to whom the approval will be routed. The notification template to the approver has to be chosen at this stage. You can also set automated actions to an approval process, initial submission, final approval, final rejection, or recall while setting up the approval process.
4. Validate results
Once the approval process is set up, we need to get back to the Deal record and verify if the process works as defined. You need to check if email notifications are being issued properly and if the request is going through the defined route.
The approval process setup in Salesforce using the process builder involves text-based inputs to get the process going.
Visual Workflow Builder in Cflow
The human mind is easily tuned to understand visual representations as opposed to text-based representations. Visual cues are easy to understand and register in our minds, rather than wordy instructions.
The Visual Workflow Builder in Cflow has been created on these lines. There is zero code involved in the creation of approval processes, you just have to drag and drop workflow elements, and lo! your approval process is set up. The workflow builder in Cflow creates approval workflows based on the flowchart approach.
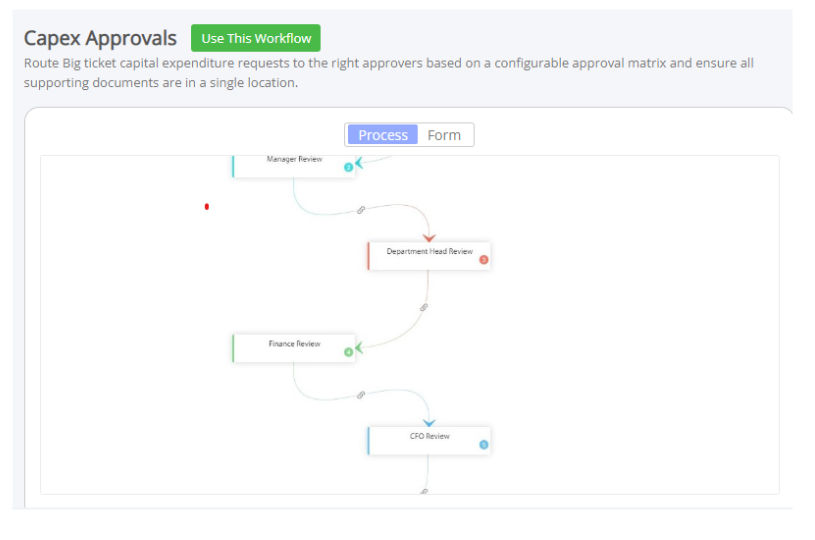
The web-based visual workflow designer can be used to model and visualize workflows. You can easily drag and drop process stages, create rules automatically, and set any process in action. Given below is the CapEx approval process workflow created in Cflow.
An exhaustive library of process templates is available for users to kickstart their workflow design. The templates are organized by departments and use cases. The box solutions provide a connected set of workflows that can be bundled together for a ready installation.
Features of the Visual Workflow Builder
Template creation
The drag-and-drop form builder provides a wide array of templates that can be customized by users according to the nature and type of the process. All the tasks in the workflow are aligned to the end objective of the process and are executed as per predefined workflow rules.
Standard Toolset
The workflow design uses a standard toolset comprising lines and shapes for representing various tasks, for creating workflow designs. A standard toolset brings consistency to workflow design.
Low-code/No-code drag-and-drop functionality
With minimal or nil dependency on coding, the visual form builder can be used by citizen developers to create workflows easily. The drag-and-drop functionality is a fun and interactive way of creating workflows.
Business rules
Rule-based business processes are best suited for automation. The task dependencies and sequence of process flow can be easily represented in visual workflows using lines and connectors.
Task and process switching
The workflow builder enables seamless switching between tasks and processes for a smooth process flow.
Designing an Approval Workflow with the Visual Workflow Builder
As mentioned earlier, creating a workflow with the Visual Workflow Builder is a simple and straightforward process that requires no coding. There are 3 parts to the visual workflow – Action, Event, and Trigger.
1. Action
Any task that needs to be automated is referred to as an action in the visual workflow. In an approval workflow, the review and approval tasks can be treated as actions.
2. Event
An event specifies the instance at which the task has to be carried out. For example, sending an email notification to the approver once a request has been submitted may be considered an event.
3. Trigger
This is an input given by the user for initiating a workflow. In an approval workflow, the submission of a request may be considered a trigger for initiating the approval process.
Other components in a workflow include filters and branching filters, these components are used for narrowing the scope of the triggers. Yes/No branching filters are optional parts of automation that may be used on a case-by-case basis.
To create effective visual workflows, users have to be aware of all the features and functionalities of the Visual Workflow Builder in Cflow. Another point to be noted is that before creating the workflow, users must be clear on the objective of the workflow.
Cflow Visual Workflow Builder versus Process Builder in Salesforce
| Attribute | Visual Workflow Builder | Process Builder |
|---|---|---|
| Workflow Creation | Visual cues for workflow creation | Text inputs for workflow creation |
| Approach | Flow-based | Text-based |
| Usability | Visual workflow elements easy to use and understand | Text inputs that require technical knowledge |
| Coding | No coding required | No coding required |
| Process mapping | Visual elements represent task dependencies and flow direction | Cannot represent the process |
| Performance | Better performance with high-volume automation features | Not equipped to handle complex business requirements |
| Cost | Low running and maintenance costs | Expensive and tedious to maintain |
| Field updates | Very easy and quick to update fields | Comparatively slow in field updation |
| Speed | Can whip up a quick form and perform simple actions based on user inputs | Comparatively slow |
| Public forms | Can connect with users who are not directly associated with your organization | Does not provide public forms feature |
Key Takeaways
Visual appeal wins hands down! The visual workflow builder in Cflow scores over the Process Builder in Salesforce mainly due to the ease of use and speed of creating approval workflows.
With the understanding of how the approval process works in Salesforce, and comparing that with the visual workflow builder, we can conclude that it is much easier and quicker to create process flows in the flowchart-based workflow automation like the one followed in Cflow.
To explore other powerful features that Cflow brings to workflow automation, sign up for the free trial right away.
What should you do next?
Thanks for reading till the end. Here are 3 ways we can help you automate your business:

Do better workflow automation with Cflow
Create workflows with multiple steps, parallel reviewals. auto approvals, public forms, etc. to save time and cost.

Talk to a workflow expert
Get a 30-min. free consultation with our Workflow expert to optimize your daily tasks.

Get smarter with our workflow resources
Explore our workflow automation blogs, ebooks, and other resources to master workflow automation.